Thursday, December 15, 2011

December - A little more work up front.

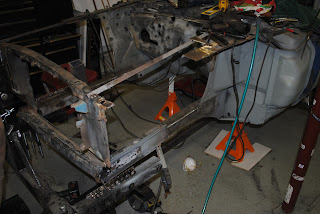
So - I'm catching up with posting and will back-date this one in particular.  The working task on the agenda is continuing to clean up the front frame rails .


You can see I've pulled away both of the front inner fender wells at this point.  The passenger side was rotted out from a long time being exposed to battery acid and the drivers side was brazed in horribly by a previous owner - likely when the car saw a collision.  It had to go, as it looked like something a 10 year old would do.

One thing worth noting - before cutting these out I took steps to weld in a couple braces to keep the radiator support where it should be.


Here's a shot across the engine compartment at the boxing that took place with teh factory portion of the frame rail exposed towards the front.  I really think this will be plenty beefy when you take into account the subframe connectors and the extra metal I put into the torque boxes. (which seems like years and years ago)


A little closer up shot.


From the 10 o'clock angle.

Wednesday, November 2, 2011

What I started with....

Dad - always the photographer took these pictures just after I purchased the car.  Its almost strange to see it all together, versus the way it looks right now.  But - these pics definitely give me motivation.  And - with some planned vacation coming up around the holidays... maybe I'll get a little closer to getting it back to looking like the above... or better.

Tuesday, October 25, 2011

Such a long time with little progress ... Blame my job

I just logged in to see my last update to the blog was July 8th.  What a horrible revelation... and such an accurate one.  Things at work have been crazy all year, but especially as we went into the second half of 2011.  There was an pretty critical project going on which I was involved in and was requiring a huge amount of time in the office and out of the office from the team and I in making sure we could hit our delivery of September 23rd.

In the end, we hit the date... and supplied a good product.  We found some bugs, solved most, and at this point in time things are operating relatively smoothly.  The team was great, most/all that still worked on the project at the end are all top notch individuals who worked well together - in light of separate difficulties that will always come up between individuals.  It is amazing what driven people can do.

--Nuff said --

Since July - I haven't been devoid of all things Mustang... quite the contrary.  Really it comes down to not having close to the time I hoped to have to do something I enjoy.  In August, there was a national Mustang event at the airport Holiday Inn here in Des Moines, put on by the local Mustang Club of Central Iowa.  Here I found a '69 coupe which was great to see what a completed project looks like.  Here are some pictures:


Yep - thats my Bub.  Looking studly in front of the 'fast beep-beep'.


Interesting thing this guy did was remove the fake air scoops that sit behind the doors.  Will note this and make a decision later.

Obviously the Grande interior.  Mine is standard...but the clean wood-grain interior did look nice.  I see more of a console in my future though.  Liked the steering wheel, though not sure how the wood trimmed wheel would go in a non-Grande car.

September --------

With the project mostly behind me and the team, my nights began to free up a little bit.  So - with that, the next step in my own build is the subframe connectors.

 I've had the connecors for well over a year.  Bought them from Tin Man Fabrications.  They looked beefy and were weld-in.  First was sandblasting and then coating them with several layers of Eastwood's Rust Encapsulator.   Also fabbed up a floor pan mounting flange which didn't come with the connectors but was recommended in strengthening the floors of the car.  Done.
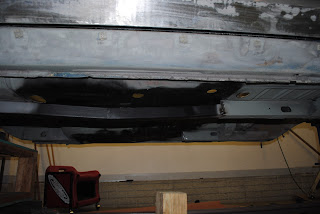
 I relaly like how they lay under the car.  From side to side they didn't fit exactly the same, though similar.  The drivers side took some persuasion from the BFH to get it into position (likely due to an earlier collision in the car's past).  But, both sides look good and are going to be with the car the rest of its days.


A shot from the passenger/rear showing the tail end of the connector.  Would buy these again.

Friday, July 8, 2011

Sandblasting Pictures

So - I realized today after a couple of back and forth emails with Jason O. that I had yet to post pictures of the actual sandblasting that I had been doing.  So here goes.  The car is turning out nicely... and thus far I have only done the exterior.

At the point above - I really haven't done much with the blasting yet (note no sand on the ground).  There will be more- trust me.

Some more preparing - pinning the car into position showing underneath.  You can see where I had cleaned up the metal on the front and rear subframes in hopes to link them together before blasting - but I in the end decided to wait until I had the whole bottom done and sealed.
 OK - so note above - you can see that the steel has really been cleaned off now - (note a LOT less blue paint and rusty color along with it).  You can also see the sand all over the ground.  The tarps did a good job holding the sand in... and with the garage door up, it keep the sand from going up and over into the rest of the garage.

The Harbor Tools pressure pot blaster did a nice job - though I would say that the dead-man valve doesn't fare very well when it doesn't open all the way and get out of the way of the flow of sand- mine is eaten away a bit.

The other thing I picked up is a piece of sliding window screen for filling a garage door or under a window... as I sprayed the sand and ran out, I would recycle the sand through the two layers of metal screen, which took all the larger particles out...allowing me to continue blasting.

Hmm... whats next.  Oh yes... sealing the 'virgin' steel with Phix and epoxy primer.  Then likely onto the subframe connectors and front end.... then inside to fix a few spots... then new rear fenders.... the list doesn't get shorter....

Friday, June 24, 2011

Its Blastin Time!

First thing's first - need to mount the car to the rotisserie.  To do that I needed to finally remove the rear end/rear axles.

For some reason - the blog isn't letting me post the pic in a horizontal orientation.  Guess I'll try to fix it later.

Here's the car on jack stands.  Getting closer....

Then it was time to fabricate the mounting points for the rear.  I was a little lax in documenting the constuction of the rear fixtures... but all they are is a pair of the same 2.5 inch square tube like the front with some 2x3 inch rectangle tube welded to the top, and drilled to fit into holes already existing in the frame.


Now I had to find a way to do the blasting here at home while the car is on the rotisserie.  I constructed my own 'booth' in the front part of my two stall garage.  Some tarps affixed to the frame of the garage door did the trick.   Then - I just had to move the car into the booth and start filling the pressure pot with sand.... AND...


I'm a little irritated that the picture above didn't turn out - but ... its ok.. I'll have other opportunities to take some more shots.  It pivots just fine - but my center of gravity is still a little off.  Going to fix it tomorrow.

Got 85% of the passenger side done tonight - hoping to get another solid chunk of the car's bottom tomorrow.    Then the driver's side and roof on Sunday if all goes well.

Tuesday, May 24, 2011

Some finishing touches on the rotisserie

Almost there - Gussets are welded in, pins in place, seams are finished.  Almost time for paint.  Here's a view of what we have just going into the paint process.

Now its time for paint - Gave each piece a scuffing with an 80 grit and some scuffing with a texture pad on a die grinder.  Then - a wipe down with lacquer thinner...


And finally - Some final assembly


All in all - things are looking great with a coat of gloss black.  The only lesson I learned here - do the spraying outside.  Even with a rattle can the overspray was crazy.  I spent an hour wiping down the floor with lacquer thinner to get up the overspray that was beyond the paper I had laid down.

Next steps - subframe connector installation; font suspension installation, and replacing the rear panel holding the tail lights.

Sunday, April 17, 2011

I love it when a plan comes together....

Not a lot of time on the rotisserie this weekend, but some visible progress.  I was able to put together the first portions of the adjustible structure that the car hangs from (via the pivot).  I was able to finish putting together the mounting points for the hyraulic ram as well.  Some updated pictures below.

attaching the upper ram bracket was a little touchy.  In the end - I think I would have moved the pin further out to get me more space, but I ended up making a small modificatino to the bracket to allow it to attach and center itself on the ram. 

Here's a picture of the way things looked as I left them tonight.  Some good progress overall.  It all hangs square for the most part - which is comforting the time I've put in was worth it.  The lower ram platform will need to be shortened (I cut it long in the first place) but that was the only issue I was able to find.

Wednesday, April 13, 2011

A little more progress- Rotisserie Upgrights

Below is a picture of the mocked up rotisserie base mounted to the upright tube and riser.  I have the vertical adjutment safety pin holes set about every three inches from 0 to 15 (knowing that my ram has 18 inches of overall travel).

Note the base for the jack - after a few cocktails, Shane and I figured this would be as good a way as any to support the jack.  The plan is to build that platform into the gusseting structure to support the rotisserie down the center plane (versus right to left of the rotating axis).

Here's a fuzzy shot with the ram in place.


The plan is to continue that piece of square tubing down to the bottom rail to complete the structure.  The last thing we did was use the hole saw to cut a pice that would attach to the outer collar on the rotating pin. This would provide an anchor point for the top/movable portion of the ram.

Below is a little closer perspective of that piece sitting on top of the ram.  Tonight I drilled a hole in it to run the pin.... mis-marked it, so I had to weld it closed and re-drill.  An eighth of an inch is a lot on a small piece like that.  Also in the pic below you can see a little closer where I have the pins set up to safety lock things into place.


More to come.

Tuesday, April 12, 2011

On to the ROTISSERIE

I've received a lot of feedback from peers at work and others who give me this confused look when I say that I'm going to build a rotisserie for my Mustang so I can really work on every nook and cranny it has to offer.

Well its true - and all that steel I purchased well over a year ago is going to go to some good use.


First off - after perusing the internet and looking for just the right plan that I thought would be robust enough to carry just about anything and be manageable for me to put togehter with a chop saw and welder... I came across this design :

http://www.harwoodperformance.bizland.com/1941buick/index.html
http://www.harwoodperformance.bizland.com/1941buick/Rotisserie(rev.2).pdf

There were a lot of things I liked about how this appears to go together.. and it had a materials list which I've stuck to about 80%... You'll see the differences later.

First things first... The steel.  I purchased it from State Steel- here in Des Moines.  They were pretty good to work with overall, but the one thing I would mention is that the steel comes in long lengths.  To cut it warrants a 10-15 dollar fee for each cut.  When I purcahsed my first load I opted to cut it with a HACKSAW myself, and it was a huge pain.  Guys in the warehouse actually had bets on how long it would take me to get through all the material.  Let's just say I did it faster than most said I could... especially driving a minivan with plates that say SNKMPIE.

Lesson learned- take a trailer that can handle long lengths... or just pay the man.

Second-  
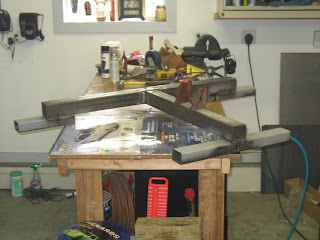
Cut the long lengths into each of the pieces needed for the rotisserie.  My recommendation here is to try to cut the larger pieces first... then wait on some of the smaller gussets/details... as I've changed mine up a little as I've went along.  But - mostly - especially with the bases, I've been very close to the plan.

Third -
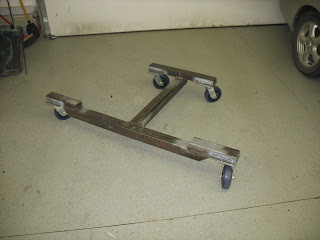
The bases.  Here are some shots of the bases.  One with casters (from Harbor Freight - about $13 a piece when maxing out the discount) and one without.


Here's one with casters - on the floor.


  Note the 45 degree cuts on the inside of the wheels closest to the cam.  What I found was the wheels when rotating came into contact with the frame.


I found that the 2x3 rectangle tubing didn't exactly accommodate my casters... so I had to expand the footprint with some angle steel.  See below
Here's the finished product.

I really liked how these allowed me to really dial in the welder and see how much penetration things would take.  In the end - the holes lined right up.


Once the bases were constructed it was time to figure out how to accommodate the upright sections on the rotisserie.  In the original design, the vertical adjustability is handled at the end of the pivot point where a 2 inch section of square tubing is capable of being pinned in multiple locations to adjust the height.  Honestly - this probably would have done a fine job for me as well, but I've seen other rotisserie models on-line and elsewhere with some vertical travel controlled as well by a hydraulic cylinder.   I really liked the idea, so I invested in two 8 ton cylinders and a 24 foot stick of 3.5 inch square tube to sheath the already cut 3 inch tube.


Here's a shot of the cylinder - think two 8 ton rams is enough?  Yeah.  Me too.


Above/Below - here are two shots of the construction of the rotating pin assemblies.  These consist of a one piece of 3.5 inch .375 wall DOM tubing and a two foot piece of 2.75 OD .25 ID DOM tube.
I bought these from http://www.onlinemetals.com/.

Trouble with these pieces I found...was that the math would indicate that these should fit inside one another.  Unfrotunately, that wasn't the case at all.  I spent three nights grinding, sanding, smoothing, and finishing the work on the inside tube on my pal Shane's belt sander so that it would fit inside the outer.  SO glad that is done.  Next time I'll hedge a 16th of an inch to get the pieces to fit together.


At this point - I've been having a lot of fun working with the HTP welder.  The unit has been great up to this point, and after about a year I had a couple things that caused me some issue.  One call to HTP, and they had two new parts to me free of charge and things have been great since.  The great thing about welding thicker material - is that its more forgiving.  With some practice, welds definitely improve.

Oh - and weld-though primer.  That stuff is worth the money as well.


Next up - drilling holes in the rotating pin.  Plus fitting the hydraulic cylinders.  Beginning the home stretch.

Fixing The Taurus

After an entire winter of not having instrument cluster lights on my Taurus, I decided it was time to change that and dig in ... finally fixing the problem which was a bad electrical connection, likely caused by the cold.

It requires some work to get the dash apart - but this was workable with a socket set, a screwdriver, and a special tool from O'Reiley's that removes the Ford radio.
Here's a shot of the dash mostly taken apart.  The hardest part was getting the radio out.  Once it was out, all that was needed was removing the fasteners behind the radio, removing similar fasteners holding the plastic panel beneath the steering wheel in place, and then popping the plastic pieces out.

Lastly the instrument cluster comes loose and the electrical connection is actually made on a thin plastic circuit sheet that runs the juice to all the spots (including lights) inside the cluster.  I cleaned the contact points with alcohol and a couple QTips, checked the lights... they worked...and put it all back together.

I should have done this months ago.

And.. Brakes
The other thing that I had to resolve on the Taurus was this strange squealing noise coming from the rear brakes.  After some closer inspection with Dad, we discovered that the springs in the passenger rear assembly had rusted through and were tumbling inside the drum. 


In the end I had to have the drums turned, and replaced hardware, shoes, and wheel cylinders.  While I was at it, I ended up getting some wild hair and decided to paint the drums.  I kind of like it... even if its on a 2002 Ford Taurus.

Here's the exposed drum with all the internals installed.


For some reason I didnt' take pictures of the car with the wheels on.  I'll update this with some pictures when I have them.

Friday, March 11, 2011

One Friday Evening with Deacon

So - Deacon wanted to go to bed early and Brynn/Margery went with Nana to a Alice and Wonderland show.   What does this do for me?  It gives me instant abilty to go roast in the rest of those floor pans!

As I went along - I kept getting better and better at welding in the panels - seeing the gap I had to work with and adjusting the welding gun as needed.  What I really noticed was that after doing the passenger side second, the passenger side was significantly better than the drivers side.. better penetration througout.

Anyhow - here are some picture of where I am at 75 percent.

Driver's side pan


Passenger side pan


Combo View!

While doing this, I have been painting up the subframe connectors with the rust encapsulator.    I'm hoping to tack them in soon.  then the car's going in the air... though I'm theorizing to change how my rotisserie is gonig together.  We'll see.


Sunday, February 27, 2011

Finally - A little more progress


So - for what seems like months... wait... yes it has been months, I have been staring at these holes in the floor of the car on both sides.  The month of February has been crazy.   We started out with the Super Bowl and the plan was to have a bunch of buddies over and sample some of the newly brewed hard apple cider.  Brynn was sick with the flu on Saturday, so we cancelled.  Then I came down with symptoms Tuesday, Wednesday, Thursday, and Friday.  Trying to work and battle an illness wiped me out and a nasty sinus infection set in and it sidelined me for more than the next two weeks. 

Just ahead of the Super Bowl I started getting the panels fitted for both holes in the Mustang's floor.  I partially tacked in the drivers side.  Today I was finally able to make some real tracks on this, I finished tacking in the drivers side, and also tacked in the passenger's side pan.  MARVELOUS.  Its so cool when you get three hours of garage time in a row.

Apologies on the pictures for these -the digital camera hasn't been taking the most in-focus pictures recently.  Maybe its time to upgrade.

Driver's Side


Passenger's Side (lets not forget that these pans don't exactly match the 69... but they're close)


View through the passenger side window


I really need to find some more time to get out into the garage- Not sure how to accomplish it though.  Kids, work, and those tasks in-between really carve into a guy's time.

Monday, January 3, 2011

December Update - In January

Okay - I have fallen off the bus a bit for the month of December.  We had deer camp in the earlier part of December, along with a miriad of work meetings that lead into the Christmas and New Year's holiday's which took the family to Michigan to see aunts, uncles, and cousins.  After getting back home on the Jan 2, I've used part of today (1/3) to get the garage cleaned up a bit and did some organization.

Some neat things though - hooked up the low temp thermostat in the garage and brought in two new rear fenders (thanks Dad!).  Really looking forward to doing some more work on the car in the coming months.

Coming - pics of the subframe connectors, work on the floors (which I wasn't intending to do, but need to do in order to get to a point where the connectors can go in.