Monday, November 15, 2010

November- Firewall Repair

Bring on the firewall.  The big thing I learned here is if you can cut your steel out in as close to a square/rectangle as possible - putting too many variances in that can make cutting out the patch panel and fitting a HUGE pain.  The driver's side I did poorly and did the passenger's side later.

The other thing I learned during this step was some of the difference between different companies and their panels.  The Canadian made panel from Nat Parts Depot was fantastic.  I can't say that the one from CJ Pony Parts was quite on that level though - I had to do a lot of work to get it to come close to fitting, including taking some of the larger bends out of it and redoing them with the assistance of a iron pipe, vice, and two by four.


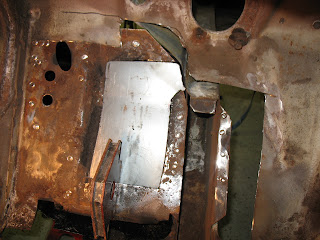
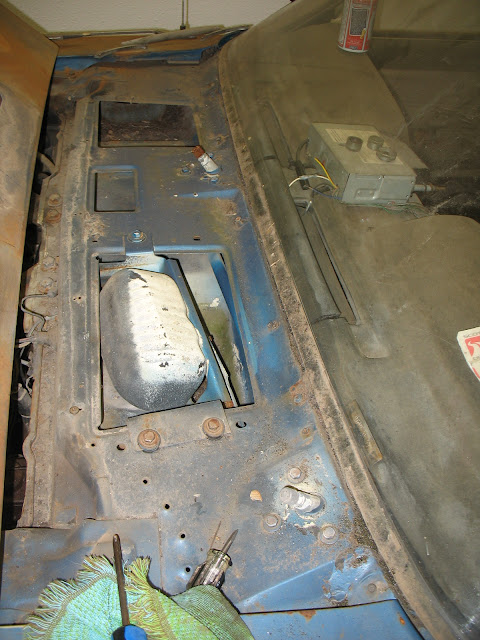
Here's a shot of the driver's side prior to welding it in.  Let it be known - I LOVE these little gap holding tools.  They keep a really nice gap and also line up the panels if they're a little bit out of alignment.  I found myself blowing through in several places here unfortunately.  The panel fit was pretty good, just not perfect.


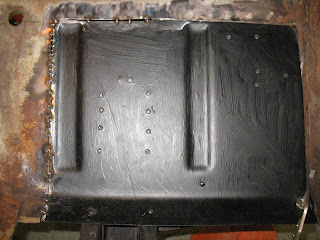
Here's a shot of the passenger side, with some tack welds holding it in place.  I had purchased a brass spoon from the store and used it on this panel.  What a world of difference.  never blew through, all that remains is some finishing on the engine compartment side, which I think I'll hold off on doing until I'm closer to getting the engine and transmission situated.

Tell you what - its a huge relief to see things slowly starting to come together!

Friday, October 15, 2010

October 2010 - Rebuilding the Torque Boxes

Time to put these suckers together.  As you could see in some of the previous posts there was some heavier pitting in the torque boxes.  There were some seams that had become unsealed over the years, and it was obvious water had gotten between layers of metal.

In all actuality I likely could have simply looked to seal the metal a bit and gone on my merry way.  I didn't exactly like this and I knew that by opening up the torque boxes (to cut out the rotted metal) I could get some exposure to inside of the boxes so I could look to take care of any lingering rust - hopefully sealing up things better than they were at the factory. 

I was able to cut out the rotten stuff and put things back together fairly well. (once I found the 14 gauge steel that isn't sold off the shelf at Menards, Home Depot, or other)
I didn't get shots of how scaly things were originally, but I can definitely say that opening these things up made a lot of sense.  I'm glad I did it, and I also found a couple locations where I saw light shining through pin holes in the fender wells that I was able to weld closed from the inside fo the torque box.


Here's a shot of the patch panel mocked in place with a magnet.  This is going to be the first time using the new welder in any large capacity.  And a butt weld to boot. 


So after welding and painting, here's a shot of the torque box all burned in - the welds didn't turn out as nice as I had hoped, but its strong, and this view should never be seen again - so my learning is the welder was more important in this case.


Here's the bottom piece mocked into place.  The big thing to notice here is that the emergency brake cable is typically snaked through the torque box here, and I've elminated that hole.  I would much rather run the E brake from the console if I can or to run no E brake at all. We'll see. 


Here's a little closer view of the same spot - with the plug weld holes drilled (glad I splurged on the drill press now!)

Below is a shot of the passenger side.  The cabin facing side of the torque box was in good shape.  The same can't be said for the vertical aspect of the box and the underside.  I ended up cutting a lot of the underside out, (welding upside down was a (sarcastic) BLAST).  Here's a shot of the small vertical piece being mocked in.


I will attempt to post some pics of the underside of the passenger side torque box - unfortunately this is the only one I have from my camera.    With these things buttoned up, it was time to move into fixing the firewall.

Saturday, September 4, 2010

So - you tear into the torque boxes - and what do you find?

A buddy and I usually discuss the 'domino effect' when tearing something down.  If you go too far you end up creating more work for yourself than might have been necessary originally.

I found a little bit of this (which I'm glad for - better to know better how things look now than to have a failure later) when I tore into the passenger side torque box.  The lower side on it was pretty rotten so I cut away close t 75 percent of it, and exposed more of the rear portion of the frame rail. 

Doing this showed me that the frame had some spots where it was in need of some additional work.

Here's me and Brynn.  Based on the timing of this shot, I'm likely just realizing the extra work I've got in front of me.


I had originally tried to use some of my rust eating gel to dig in and get some of the heavier rust out.  For some reason it's not a 'gel' anymore.  Go figure.  So some heavier grindign was required.

The top picture shows my patch - not the best weld in the world, but considering I was going from a 12 gauge sheet to a 14 gauge sheet, on the vertical, after really not welding anyting for well over a year I'll take it.  Especially when its hidden behind the torque box.

The other neat fact.  The patch was stainless steel left over from a tig welding class @ DMACC.   There's also a piece in the bottom of the frame that needs replacing as well.I'm not dead set on how big the patch will be yet.

Looking at the bottom of the two pictures you can see how large the original stainless patch piece was.  I made several passess trying to get my penetration right, grinding down any poor looking welds.


Here's a view of the driver's side torque box. - I still need to do a little more cutting on the rear of the box to get all the really rusty stuff out of there, then I intend to weld back that back piece and hit everythign with abbrasive, then a rust killer, then some of eastwood's rust encapsulator - which I've used before and LOVE.

Thursday, August 26, 2010

Pics of Torque Boxes

Floor pan with the seat cut out


at the bottom below, you can see the front side of the torque box - really solid, very little rot.


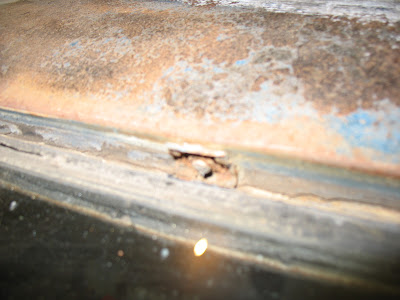
Here's the view of the torque box on the inside, where the firewall/floor is/was welded to the metal structure.  Towards the top you can see a hole that had been rusted through and that the pitting around the hole.

I'm wondering if that's the worst spot, about just cutting it out and welding in new?  The metal on the lower left side still looks almost new.


A little better shot of the trouble area.

And another shot - but the picture is sideways.

Tuesday, June 15, 2010

Bondo-rific!


So - I decided to pull the Mustang out of the garage last night to strip the back end down to metal to see what I'd be forced to work with (or replace I suppose as well).  I knew the drivers side was heavy in the plastic category, but didn't have a lot of line of sight to the passenger's side rear.

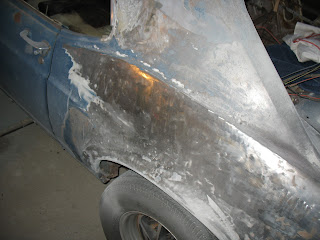
In the end, both were a SEA OF BONDO.  Note the snowy layer of bondo on the wheel and concrete of my driveway.


adfadf


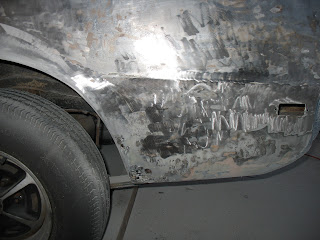
This last pic amazed me the most.  a LAP weld smathered with BONDO?  Come on.  I think the guy who fixed this car in the past only had one tool in his belt...and that was a big fat can of plastic filler.  Oh well.  What this little experience has taught me.... get the whole car down to bare metal to find out what you need, then order all the sheet metal together.... hoping to save some bucks on shipping.

Wednesday, May 5, 2010

May 2010

Getting the engine out was part of the battle.  The next thing I moved to was the glass.

Not sure what happened, but I don't have pics of this FUN and EXCITING process either.  Lets just say that the windshield is held in place by this thick, black tar-like sealant that is a HUGE pain in the tail to work around to get the windshield unstuck.

After I was done, Shane gave me a tid-bit where you can fish a thin wire through the sealant and use the wire to disengage the glass from the car.  Oh well.  I'll use that trick when I do my next car 25 years from now.

More disassembly.

Oh.  Before I go into the additional disassembly, I'll mention that I also found a neat item at the Cedar Rapids swap meet  in late April.  I found a 9" Ford rear end housing which set me back a mere twenty bucks.  Its 7 inches too wide, so it will need to be narrowed, but that might be an adventure for another day... or I'll pay someone to do it.  We'll see.

Next on the list was the front suspension.  I was pretty affraid here, not knowing how easy it would be to get all the fasteners off in the right way.  In the end, I did end up having to cut the springs in a couple places to get them out (I'm not using them anyway)... but things are out.


Here's the mass of stuff (above) which I'll probably not use again... so I'll have it in the attic for the next 5-10 years until I know for sure I won't need it anymore.


Here's the empty void left by the suspension. You really can't see it in this picture, but there's a lip on the frame there where the upper A arm sits.  What's crazy is that this location is a great/horrible spot to gather dirt/grime/rot.


Here it is, cleaned out.  Amazing that this isn't more rotten.


One of the things I didn't post a lot about in my previous post was my work to get the dash/heater/etc out.    I pulled out the ash tray and after sifting through some old pennies, dirt, dust, etc... I found what you see in the picture below.  I don't believe this was used for any electric purpose.... but I may be 100% wrong there.


Lastly - one other new item has made its way into the garage.  An new welder has arrived.  This one should weld the thicker and thinner metals all together.  I tried it tonight on some of the heavier stock for the rotisserie and it did a pretty nice job.  I actually had to dial the heat back a bit to get the weld looking nice.  We'll see how it handles the thinner steel before I sell my smaller Lincoln welder.


--------------------------------------


These last two pics I thought I should post - some of you might know my buddy Shane.  If not, I snapped a couple pictures of what he's working on right now.  They're below.


Its been a while since JANUARY

So I'll try to break this up by timeline... because yes... for a time there my progress in the tear-down did slow quite a bit.  Here's February.

FEBRUARY

I spent quite a bit of time sandblasting in the homemade bin and made some progress on the roof.  Unfortunately, the siphon feed setup I was using was clogging quite a bit and it wasn't making as quick work of things as I had hoped.

Knowing that I'd need to get the car into the driveway for some more significant stripping I decided to put that on hold. 

The next thing I tried was additional testing of that Eastwood Acid etch seen in an earlier post.  Here's how the roof looked in process and the hood after some light work with the etch and some ceran wrap (I thought it might help keep the goop from drying out).


My opinion... but I think its quite a bit cleaner... there's still some deeper rust pits, but I can see them now... and hopefully a higher temp will help the goop act a bit more forcefully come spring time.

MARCH

Things started to pick up a bit in March.  Why?  Because the PFG bonus decided to hit and I was able to use some of it to further 'invest' in the car.  First on my list - STEEL.


As you can see here we've got some heavy duty stuff.  I'm guessing in the 500+ pound range.  Not a bad shot of the car in the background.  Neat so see how it looked then to now when I'm finally posting this.

The steel will eventually be destined for a home built rotisserie.  Yep  -I intend to flip the car like a chicken in a wal-mart roaster.  Now that I've got the steel, its time for some more disassembly.  But first, a shot of my cheesy smilin' little helper.


On to more disassembly.  For some reason I misplaced or delted the pictures of just the fenders off the car.  No big whoop there, but the hood followed the fenders along with the radiator, pullies, and all the other accessories in front.

In progress:

Here's the aftermath:


I hate to admit it... but these things sat on the floor for several weeks.   

On to the engine.


And its out.  Oh - one thing worth mentioning... I tried one last time before yanking this and everything else to get the car into a movable gear.  It ran, but it would have been great if I could have limped it out into the driveway for stripping and working. 

Still ran, but no forward or reverse gears- so it was time to come out.


I wonder if old Jake and Son in Conrad is still open for business.


Here's the engine on the stand (borrowed from Shane)


The void that was left after removing everything.


Saturday, January 16, 2010

A little experiment for Brynn and I - De-rusting the hood

I wanted to go work on the car and Brynn wanted to hang with daddy - so inspired by an early morning watching of Sid The Science kid, we decided to do a science experiment with daddy's new gallon of Eastwood Acid Etch Gel.


Here's the surface I'm working with - painted with a light film of rust and a rusty dust covering the metal.


Our sample... masked off and slathered with the gel.  The directions indicate that it works best when the temp is 70 and above.  I'm not going to be near that with it at -5 outside.... but I was able to get it to 55 for our exercise. 

What I found with this stuff - is that it does like to slowly dry out.  After about an hour - I took Margery's plastic wrap out and covered the location so that it would keep as much moisture as possible.  It mad quite a bit of difference.


Here's the spot after three hours.  Pretty impressive if you ask me .  I scrubbed it down with a scotch brite and some cleaning solution.. .and was left with this.  Not too shabby!  Now I need to do the rest of the car!

It does appear that the rust is coming from underneath the paint a bit... so I may need to de-rust, strip paint, then de-rust again.  We'll see.

Will it run? - Carb rebuild

Now its time to start the process of seeing what there is to work with from a fuel and fuel delivery perspective.  I had already unhooked the gas tank early on a couple months ago so since it didn't drain much I figured the tank was probably pretty empty.


Once the screws that hold the tank in were removed, the tank came right out.  Manuals show some putty/sealer in the seam between the trunk and the tank- but if it was there, it was long since deteriorated.  The void left by the tank is seen above.


Here's the mouth looking into the tank.  The picture doesn't do it much justice, but when looking into the tank it does look okay on the inside.  I purchased a small telescoping mirror that I will use to look beyond the view seen here.  But - since I'm not there yet, that task can wait.


So - I've always thougth of gasoline as being somewhat a light golden/yellow color.  That's not de-icer in that jug - thats what I dumped out of the tank.  Nice it game out to be just about a gallon.  Wow - if any of this junk is in the carb- then I'm in trouble.


Next step is the carb.  Dad came over and we both walked through the disassembly of the two barrel carb.  We stopped by the Arnold Motor Supply store here in town and picked up the handy-dandy carb cleaner bucket in the picture above.  Lucky me - the carb pieces just barely fit in the can. 

I didn't get any pictures of the inside of the carb - but wow - the bowl in that sucker looked like it hadn't seen a drop of fuel in a LONG time.


Here's the carb sitting in the can - it put out a pretty bad smell.  After huffing it for an evening I woke up super sick the next morning.  Next time the mask is going on for work like this.  It works great though... the solvent melts off all the junk that was on the carbuerator.  With this and an old toothbrush - things cleaned up well.


After cleaning and reassembly - here's the finished result.  Nice and SHINY.

So - the big question - does the car run once its got fuel and spark (I checked) - will the car run?  Interestingly enough - the answer is yes... and IT RUNS pretty well.  There's a little bit of top-end chatter, but past that, the car does start, warm up, and rev.  The carb definitlely could use some tuning - but knowing that the old 302 runs and feels good... it says a lot.  I tried to put it into gear earlier - and it didn't want to go into drive or reverse - so there may be some issues with the auto transmission.  Oh - well - I'll probably go with a manual transmission anyway.

A little more disassembly

The windshield of the car does have a slight scratch in it due to some severely worn wiper blades.  So - I decided I would work on the trim around the windsheild, the wiper arms, and the cowl behind the hood.  I wondered what I would find under that cown with regards to decay/rust.


So -you read on-line that removing the windsheild trim is a huge pain.  Talking to some friends as well they've echoed this.  So - I followed all the direction that people had and went to the local parts store and bought the special tool for the job.... and ended up only using it as a pry to lift the trim up.  The tabs (one of which shown above) are so tight that I had to use my pick set to get in and pull the tabs loose.  The tool just wouldn't get behind the tabs.

After removing al the trim and exposing the drain behind the hood.  It looks like its in pretty good shape! 


Here's a view of the windshield with all the trim gone and the job done.  Oh - before going on to something different - the wiper arms.  They were on there pretty tight - and prying on them looked like it would probably damage the steel behind the hood.  So - what worked for me was to use a larger vice grip and clamp it just under the wiper arm.  Then - simply pry against the vice grip (versus the steel sheet metal) with a screwdriver on each side of the post.  They popped right off.